
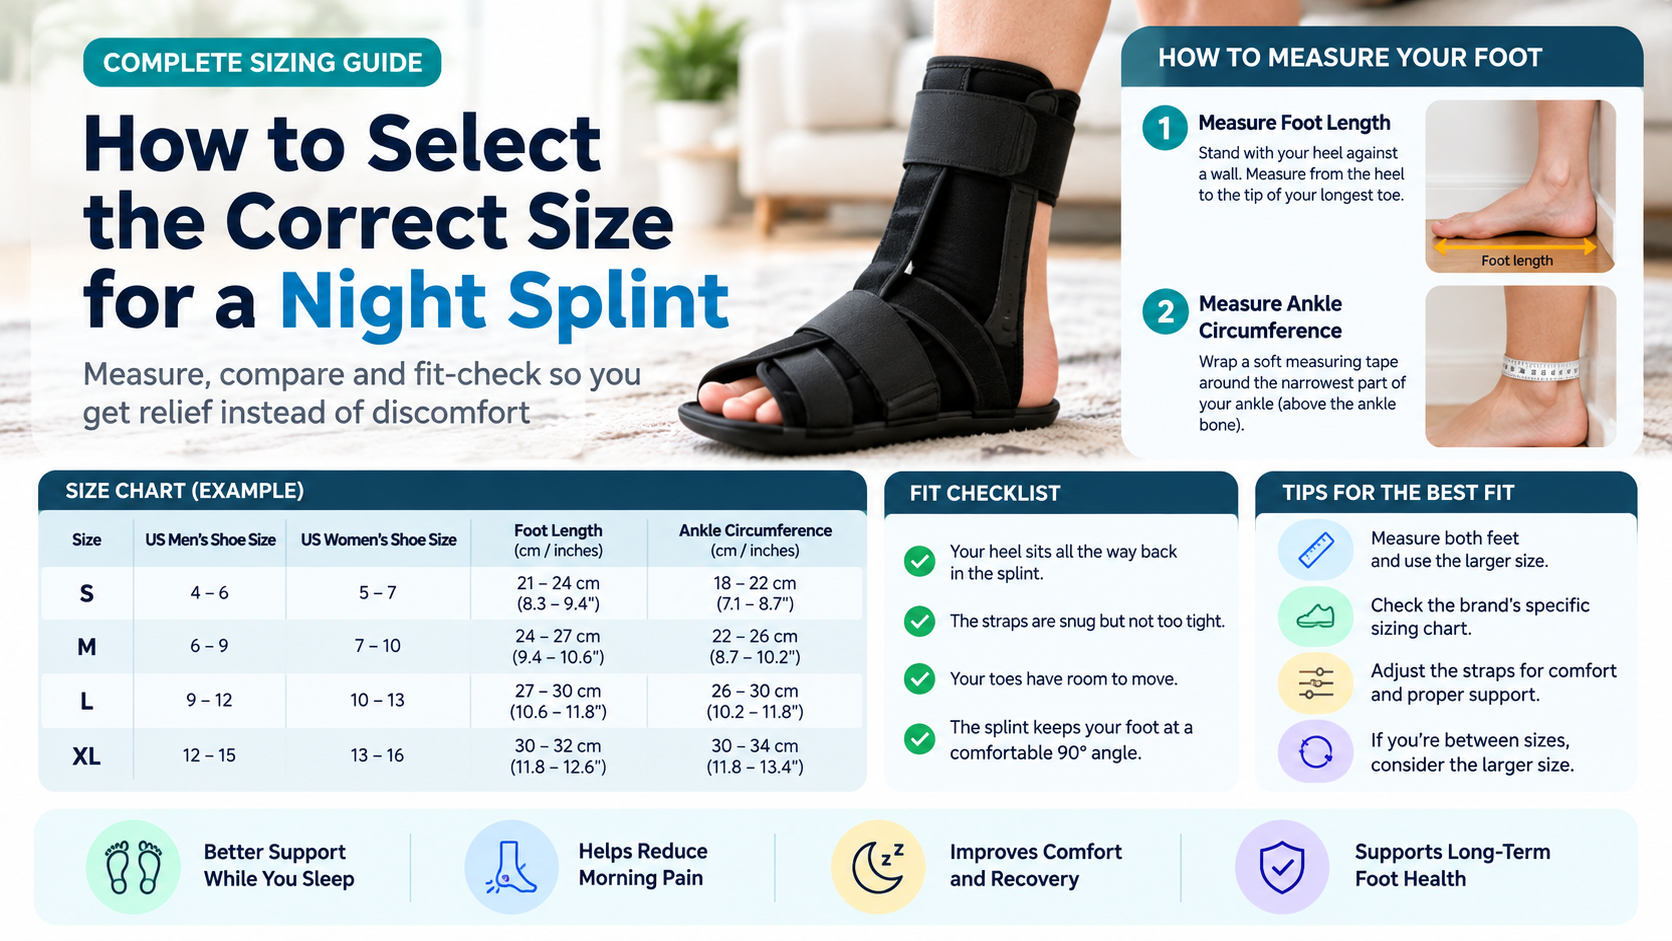
How to Select the Correct Size for a Night Splint

A night splint can be a valuable part of managing heel pain and tight calf muscles, but only if it fits. A splint that is too small can pinch the toes and rub the skin. One that is too large lets the foot slide around, so it never holds the gentle stretch it is meant to provide. Either way, you end up with a product that stays in the closet or interrupts your sleep.
This guide walks you through how to select the correct size for a night splint: what to measure, how sizing charts work, how fit differs between splint styles, how to check the fit at home, and what to do if you fall between sizes.
Table of Contents
- What a Night Splint Does and Why Size Matters
- Night Splint Styles and How They Are Sized
- The Four Measurements to Take
- Step-by-Step: How to Measure Your Foot and Calf
- How to Read a Sizing Chart
- What to Do If You Are Between Sizes
- Special Fit Considerations
- How to Check the Fit When Your Splint Arrives
- Signs Your Night Splint Is Too Small or Too Large
- Common Sizing Mistakes
- Caring for Your Splint So It Keeps Fitting
- When to Talk to a Healthcare Professional
- Frequently Asked Questions
- Final Thoughts
What a Night Splint Does and Why Size Matters
While you sleep, most people let their feet relax with the toes pointed downward. This shortens the calf muscle and the connective tissue under the foot (the plantar fascia). A night splint holds the foot at a gentle, fixed angle, with the toes drawn slightly upward, so these tissues stay lightly stretched through the night. It is commonly used by people managing plantar fasciitis, Achilles tendon tightness and morning heel pain, often as part of a plan recommended by a healthcare professional.
The effect depends on the splint staying in the right position. A good fit means:
- The heel sits firmly in the right place, so the angle stays consistent.
- The straps hold the foot without cutting into the skin.
- The toes and ankle have enough room to avoid pressure points and numbness.
- The splint is comfortable enough to wear for several hours of sleep.
Night Splint Styles and How They Are Sized

| Style | How It Works | Typical Sizing Basis |
|---|---|---|
| Boot style | A rigid or semi-rigid shell holds the foot at a set angle; straps close around the foot and calf | Shoe size, and often calf circumference |
| Sock style | A soft sleeve with a strap draws the toes toward the shin | Shoe size ranges or S/M/L; some are one-size-fits-most |
| Dorsal style | A shell on the front of the shin and foot leaves the heel free, which some find easier for sleeping | Shoe size, sometimes plus calf width |
Boot styles tend to be the most size-specific because the shell cannot stretch. Sock styles are more forgiving but still need the right length and strap reach. Whatever the style, always follow the manufacturer’s chart for that exact product, as sizing is not standardized across brands.
The Four Measurements to Take

- Shoe size: Your regular size is the starting point for most charts. Note whether it is a men’s, women’s or youth size, and which country’s system it uses.
- Foot length: The distance from the back of your heel to the tip of your longest toe. This is often more reliable than the size printed on your shoes.
- Calf circumference: The measurement around the widest part of your calf, which matters for boot styles with calf shells or wide straps.
- Foot and ankle width: If your feet are wide, high-arched or often swollen, you may need a roomier size or an adjustable design.
Step-by-Step: How to Measure Your Foot and Calf
- Measure in the evening. Feet swell slightly through the day, and a splint should fit comfortably at the end of it.
- Gather your tools: A soft, flexible tape measure (or a piece of string and a ruler), a sheet of paper, a pen and a flat wall.
- Measure foot length. Stand with your heel against the wall. Mark the paper at the tip of your longest toe (it may be the second toe) and measure from the wall to that mark. Repeat for both feet.
- Measure foot width. Measure across the widest part of the forefoot, near the ball of the foot.
- Measure the calf. Sitting with your foot flat on the floor, wrap the tape around the widest part of the calf, snug but not tight.
- Record everything. Write down the numbers for the left and right sides, in the units the chart uses.
- Use the larger side. If your feet or calves differ, size for the larger one, since a splint that is too tight is more likely to be abandoned.
Tip: If you have swelling that changes a lot day to day, measure on a typical day and consider adjustable straps that allow some flexibility.
How to Read a Sizing Chart
Sizing charts usually list sizes (S, M, L, XL or numbered) alongside shoe size ranges and sometimes calf circumference. The example below is for illustration only, because every product has its own chart:
| Size | Shoe Size Range (example layout) | Calf Circumference (example layout) |
|---|---|---|
| Small | A lower range of shoe sizes | A lower range of calf measurements |
| Medium | A middle range | A middle range |
| Large | A higher range | A higher range |
| Extra large | The highest range | The highest range |
When reading a real chart, check these points:
- Which size system is used: men’s, women’s, unisex or a specific country’s system.
- Whether the chart is based on shoe size, foot length or both.
- Whether calf circumference is listed and whether it must also fall within the range.
- Whether one splint fits both feet or it is sold as left and right.
- Any manufacturer notes about sizing up for swelling or wide feet.
What to Do If You Are Between Sizes
- Check which measurement is the limiting one. If your foot length fits one size but your calf fits another, consider which is more likely to cause discomfort in the splint design you chose.
- Consider adjustability. If straps and closures have a wide range, a larger size may be fine. For rigid shells, a too-large size may let the heel slide.
- Read the manufacturer’s guidance. Many charts say to size up or down in specific situations.
- Check the return policy. An easy exchange makes it simple to correct a sizing mistake.
- Ask a professional. A podiatrist, physical therapist or pharmacist can help you choose between sizes.
Special Fit Considerations
- Wide or high-volume feet: Look for products with adjustable straps and soft, padded interiors.
- Swelling: Fit the splint when your foot is at its larger evening size and leave a little room.
- Sensitive skin or poor sensation: If you have diabetes, neuropathy or reduced feeling in your feet, speak to your healthcare provider before using any night splint, because pressure injuries can go unnoticed.
- Different leg sizes: If your legs differ significantly, size for the larger side.
- Children and teens: Use youth sizing only if recommended by a professional, and check fit more often as they grow.
- Side sleepers and restless sleepers: A lower-profile or sock-style design may be more comfortable, but it still has to fit correctly.
How to Check the Fit When Your Splint Arrives
- Try it on in the evening while sitting, before your first night of use.
- Position the heel first. The heel should sit firmly at the back of the splint with no gaps.
- Fasten the straps from the bottom up. They should feel snug and supportive, not tight.
- Check the toes. You should be able to wiggle them, and they should stay warm and a normal color.
- Feel for the stretch. You should feel a gentle pull along the arch and calf, but no sharp pain.
- Walk carefully only if the splint is designed for it, as most are for sleeping and resting.
- Wear it for a short time first. Many people start with an hour or two and build up over several nights.
Signs Your Night Splint Is Too Small or Too Large

Too Small
- Toes feel pinched, numb or tingly
- Straps dig into the skin or leave deep marks
- Pain or throbbing that increases overnight
- Difficulty fastening the closures
Too Large
- The foot slides or twists inside the splint
- The heel lifts out of position
- Straps keep loosening during the night
- You feel little or no stretch
Just Right
- The heel stays in place
- Straps are snug but comfortable
- Toes can move and look healthy
- A mild, steady stretch is felt without pain
Common Sizing Mistakes
- Guessing from shoe size alone: Brands differ, so always compare with the product’s own chart.
- Measuring in the morning: Feet are smaller then, so the splint may feel tight by evening.
- Ignoring calf size: For boot styles, a calf that is too wide can make the straps uncomfortable.
- Sizing for the smaller foot: Always size for the larger side.
- Choosing the wrong size system: Men’s, women’s and international sizes differ.
- Overtightening straps to compensate: This causes pain and does not fix a poor fit.
- Not testing before bedtime: Try it for a short time in the evening to spot problems early.
Caring for Your Splint So It Keeps Fitting
- Follow the care instructions on the label, usually hand washing the soft liner and wiping the shell.
- Air dry away from direct heat, which can warp plastic and damage foam.
- Check straps, closures and padding regularly for wear.
- Store the splint flat or as recommended so it keeps its shape.
- Replace it when padding flattens or the structure no longer holds the angle.
When to Talk to a Healthcare Professional
Get advice if you experience any of the following:
- Numbness, tingling, coldness or color changes in the toes
- Skin redness, blisters or sores where the splint touches
- Pain that gets worse rather than better after a few nights
- Heel pain that does not improve after several weeks of consistent care
- Diabetes, neuropathy, circulation problems or open wounds on the foot or leg
- Uncertainty about whether a night splint is right for your condition
Frequently Asked Questions
Should I size up or down if I am between sizes?
It depends on the splint. For adjustable, soft designs, the larger size often works. For rigid boots, a snug heel fit is important, so check the chart notes or ask the manufacturer. A professional can also help you decide.
Do I need a left and right splint?
Some products are sold as a single splint that fits either foot, while others are left or right specific. Check the product description before ordering.
Is a night splint supposed to feel tight?
It should feel snug and supportive, with a gentle stretch in the arch and calf. Pain, numbness or tingling is a sign to loosen the straps or check the size.
Can I use my shoe size to pick a night splint?
Shoe size is the starting point, but it is best to also measure your foot length and, where listed, your calf circumference, and compare them with the manufacturer’s chart.
How long does it take to get used to a night splint?
Many people need several nights to adapt. Starting with shorter periods and building up gradually can make it easier.
What if my night splint is the right size but still uncomfortable?
Try adjusting strap tension, adding a thin sock if the manufacturer allows it, or choosing a different style. If discomfort continues, speak to a healthcare professional.
Should I replace my night splint if my feet change size?
If your weight, swelling or foot shape changes significantly, re-measure and check that your splint still fits correctly.
Final Thoughts
The best night splint is the one that fits well enough for you to wear it consistently. Measure your foot length, calf circumference and foot width in the evening, size for the larger side, compare your numbers with the manufacturer’s chart, and test the fit before your first full night of use.
If you are unsure about sizing, have swelling, diabetes or circulation problems, or your heel pain is not improving, speak with a podiatrist or other qualified healthcare provider. A properly sized splint, used consistently and with professional guidance when needed, gives you the best chance of waking up more comfortable.
Disclaimer: This article is for general informational purposes only and is not a substitute for professional medical advice, diagnosis or treatment. Always consult a qualified healthcare provider about your specific condition before using a night splint.