If you’ve ever tried generic insoles only to find they don’t relieve your foot pain, you’re not alone. Millions struggle with discomfort caused by poor foot alignment, overpronation, or conditions like plantar fasciitis—issues that off-the-shelf inserts simply can’t fix. A custom foot impression kit offers a smarter, more precise solution by capturing the exact 3D shape of your feet from the comfort of home. Unlike smartphone apps that estimate foot contours from 2D photos, these kits use high-density impression foam to record your arch height, heel depth, and pressure points under controlled conditions—delivering results used in medical-grade orthotics.
The process is simple: you receive the kit by mail, follow step-by-step instructions to take accurate foot molds, then return them to a lab. Within 7–14 days, you’ll receive custom orthotics tailored to your biomechanics. Whether you’re managing chronic heel pain, standing for long hours at work, or training for a marathon, this guide explains exactly how a custom foot impression kit works, how to use it correctly, and why it’s a cost-effective alternative to expensive clinical visits.
Kit Components Explained
Every reliable custom foot impression kit contains specialized tools designed to capture your foot’s true shape with clinical accuracy.
Foam Impression Box and Cores
At the heart of the kit is a rigid box filled with high-density impression foam. Inside, two removable foam cores—one for each foot—record your footprint when pressed under controlled weight. As you place your foot on the core, the foam deforms precisely to your arch, heel, and forefoot, creating a negative mold that mirrors your foot’s anatomy. Brands like EXCEART use advanced foam formulations that retain fine details and resist deformation, ensuring the final orthotic matches your foot exactly.
Tracing Template and Order Form
Alongside the mold box, you’ll receive a paper template to trace an existing insole. This ensures your custom orthotics will fit properly in your shoes—whether dress shoes, sneakers, or boots. The order form collects essential details: your activity level (e.g., running, walking, standing), areas of pain (heel, ball of foot), material preferences (soft or firm top cover), and foot dominance. These inputs allow labs to fine-tune the orthotic’s support, thickness, and flexibility.
Return Shipping and Instructions
Most kits include a pre-paid return label for easy mailing. A detailed instruction manual—often with labeled diagrams (e.g., Figure A–E)—guides you through proper posture, pressure application, and alignment. Skipping these steps can result in inaccurate molds, so it’s critical to follow them exactly.
Why Use a Foot Impression Kit?
Custom foot impression kits bring professional-level diagnostics into your home, offering personalized orthotics without the need for a clinic visit.
Remote Orthotic Access
You don’t need to travel to a podiatrist’s office. The kit arrives at your doorstep, and once you mail back your impressions, a lab fabricates your orthotics and ships them directly. This is especially valuable for people in rural areas, those with mobility issues, or anyone seeking a faster, more convenient solution.
Targeted Pain Relief
Orthotics made from accurate molds address the root causes of discomfort:
– Plantar fasciitis: Arch support reduces strain on the inflamed ligament
– Flat feet: Prevents excessive inward rolling (overpronation) and associated knee or back pain
– High arches: Distributes pressure evenly, avoiding metatarsal overload
– Heel spurs: Cushions impact and improves gait mechanics
Users commonly report noticeable relief within 2–6 weeks of consistent wear.
Performance and Lifestyle Benefits
Beyond pain relief, custom orthotics enhance daily function:
– Athletes gain stability and efficiency during running or cycling
– Healthcare workers stand longer with reduced fatigue
– Travelers walk comfortably for hours without soreness
With options for dress, athletic, and casual shoes, these insoles adapt to any lifestyle.
How to Take a Foot Impression: Step-by-Step
Accuracy depends on technique. Follow these steps carefully to ensure your orthotics fit and function as intended.
Prepare Your Setup
- Unpack the kit on a flat, stable surface.
- Sit in a sturdy chair with feet flat on the floor.
- Bend knees to 90 degrees, aligning the center of your knee over the ankle and foot.
- Remove shoes and socks—bare feet are required.
Pro Tip: Have someone assist you to maintain alignment and prevent shifting.
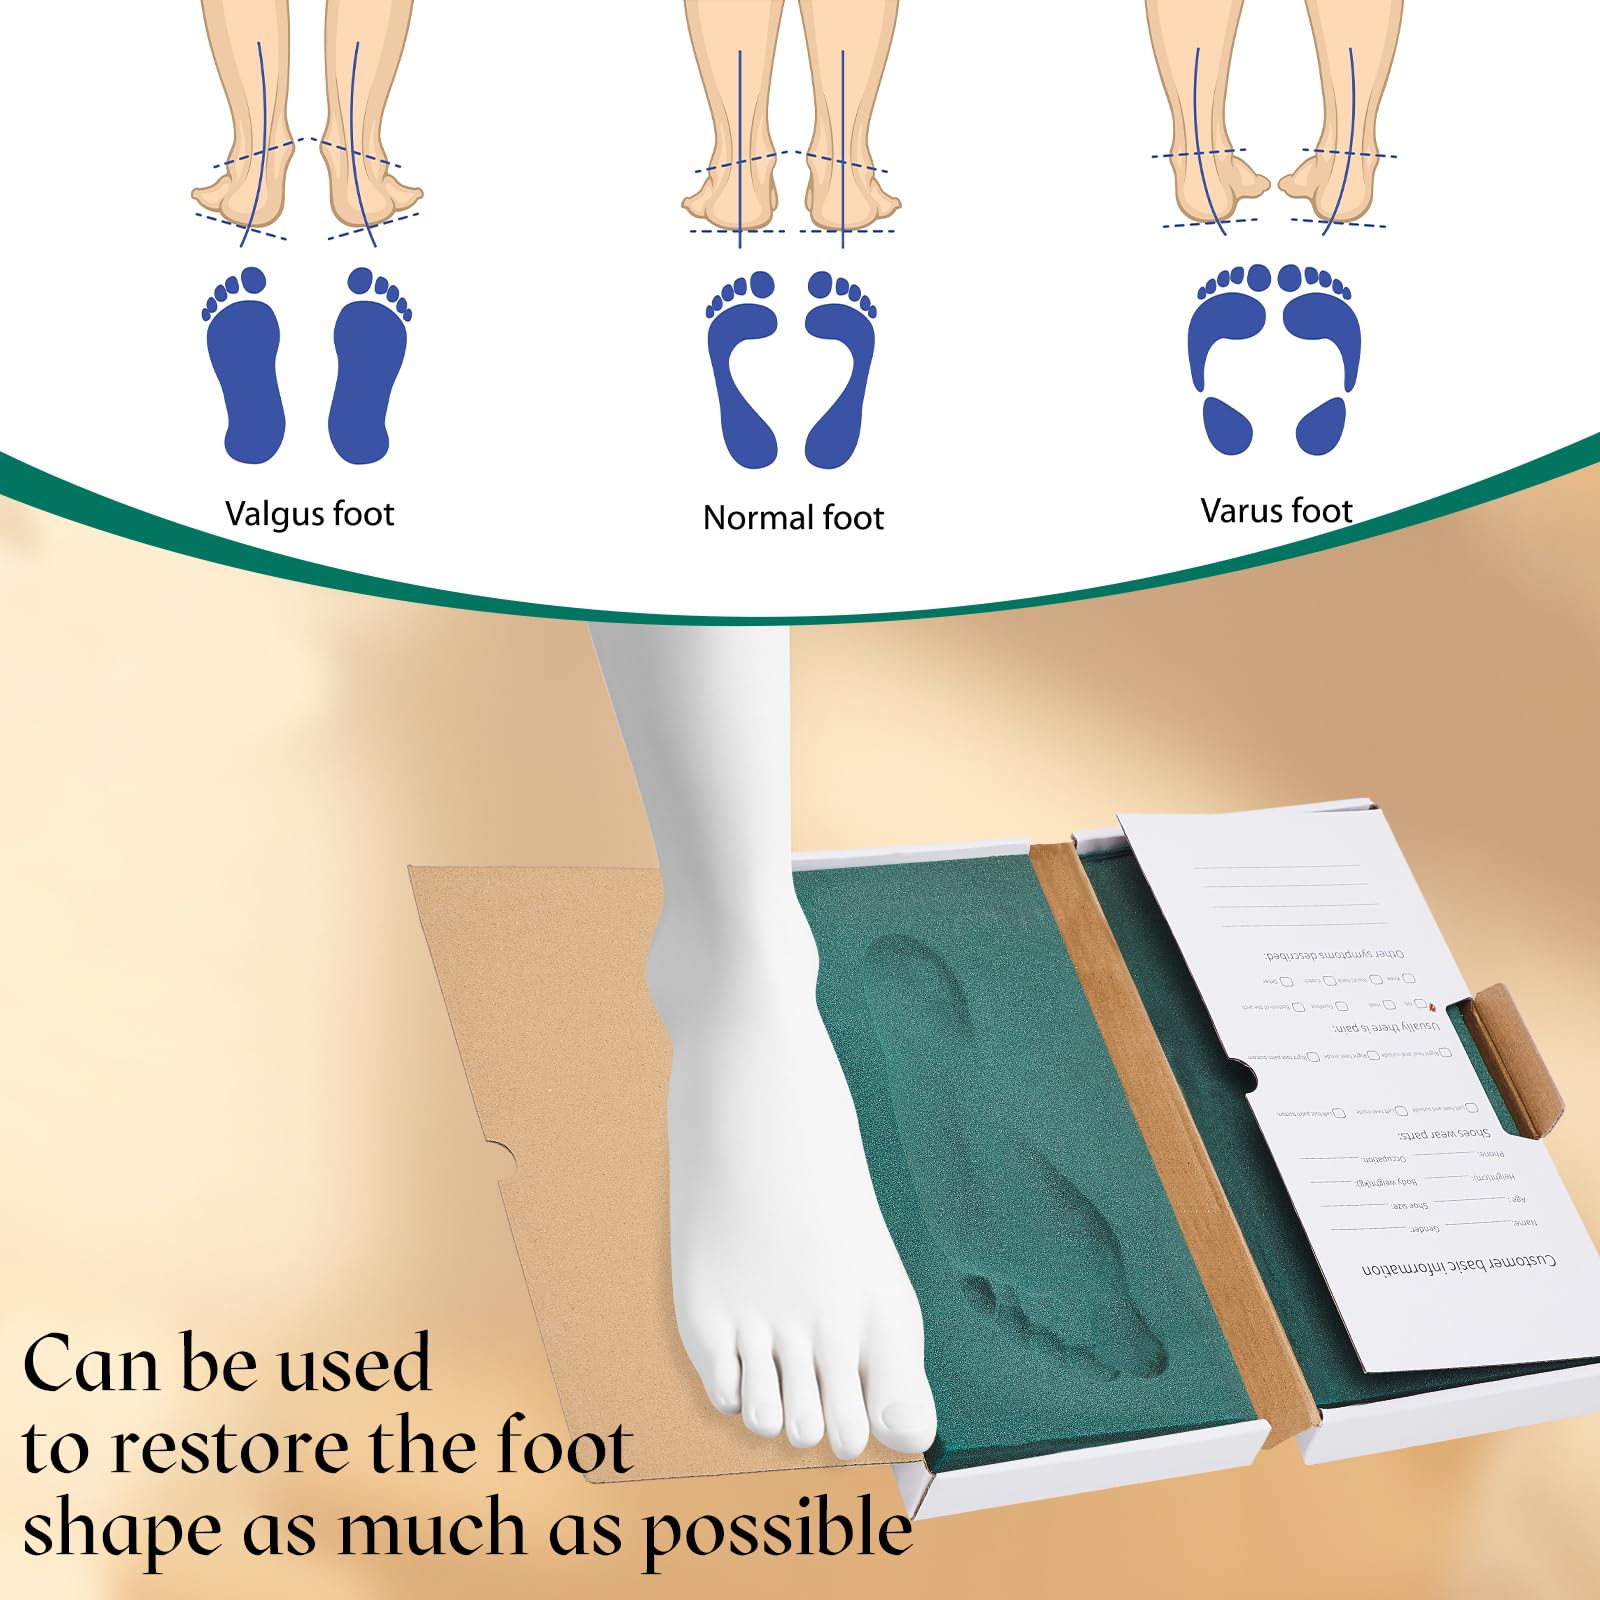
Choose the Right Method
Your foot type determines the best impression method. Using the wrong one can lead to over-support or poor fit.
Semi Weight-Bearing (Seated)
Best for: Flat feet, neutral arches
How to do it:
– Gently place one foot on the foam core.
– Allow natural body weight to sink the foot ½ to 2 inches into the foam.
– Keep muscles relaxed—don’t grip or press down.
– Hold for 60 seconds, then lift straight up.
This method prevents excessive arch collapse and captures a neutral resting position.
Weight-Bearing (Standing)
Best for: High, rigid arches
Why: Seated impressions may not compress the arch enough, leading to orthotics that feel too high or painful.
How to do it:
– Stand with feet shoulder-width apart.
– Slightly bend knees and align kneecaps over mid-foot.
– Distribute weight evenly and hold for 60 seconds.
Avoid shifting or leaning—this distorts the mold.
Heated Foam Core (Advanced)
Used in professional-grade kits:
1. Preheat oven to 275°F.
2. Heat one core for 2 minutes.
3. Place it in the box and step on gently—it will be warm but not burning.
4. Stand still for 60 seconds, then cool before removing.
Warning: Never microwave the core; use only conventional ovens.
Foot Type Guidelines
Matching method to foot structure is critical.
| Foot Type | Recommended Method | Outcome if Done Wrong |
|---|---|---|
| Flat Feet | Semi weight-bearing (seated) | Over-compression → shallow arch mold → ineffective support |
| High Arches | Weight-bearing (standing) | Under-compression → overly rigid orthotic → discomfort |
| Neutral Arches | Semi weight-bearing | Accurate, balanced mold |
Expert Note: If unsure, choose semi weight-bearing—it’s safer for most foot types.
Keys to an Accurate Mold
A successful impression reflects your foot’s true shape. These principles ensure precision.
Maintain Neutral Alignment
Keep your foot straight—no rolling inward (pronation) or outward (supination). Your knee should point forward, aligned over the center of the foot. Misalignment shifts pressure and creates asymmetrical molds.
Apply Even Pressure
Press heel and forefoot into the foam simultaneously. Uneven pressure leads to lopsided impressions, causing orthotics to tilt or rub.
Avoid Common Errors
- Don’t press too hard: Full compression flattens the arch.
- Don’t curl toes: Distorts the forefoot and causes pressure points.
- Don’t stand unless instructed: Alters foot mechanics.
- Don’t reuse non-reheatable foam: Most kits allow only one impression per core.
Visual Cue: A good mold shows a clear, continuous arch with no gaps or smearing.
What a Good Impression Looks Like
After removing your foot, inspect the mold closely.
- Arch: Clearly defined, not collapsed or over-raised
- Heel Cup: Deep and centered
- Forefoot: Full contact up to the metatarsal heads
- Depth: Between ½ and 2 inches, depending on foot size
- Edges: At least 1.5 inches of clearance around the foot inside the box
If the impression looks shallow, misaligned, or smeared, repeat the process if the foam allows remolding.
Post-Impression Steps
Once both feet are molded:
- Inspect both impressions for clarity and symmetry.
- Complete the order form:
– List pain areas (e.g., heel, ball of foot)
– Specify activities (running, standing, walking)
– Choose materials (soft top cover, firm base) - Trace your shoe insole (if required) to confirm fit.
- Seal the box tightly with shipping tape to prevent damage.
- Mail using the pre-paid label.
The lab will:
– Analyze your foot’s biomechanics
– Create a positive cast from the mold
– Craft orthotics using your specifications
– Ship within 7–14 days
Kit Example: EXCEART Foot Impression Box
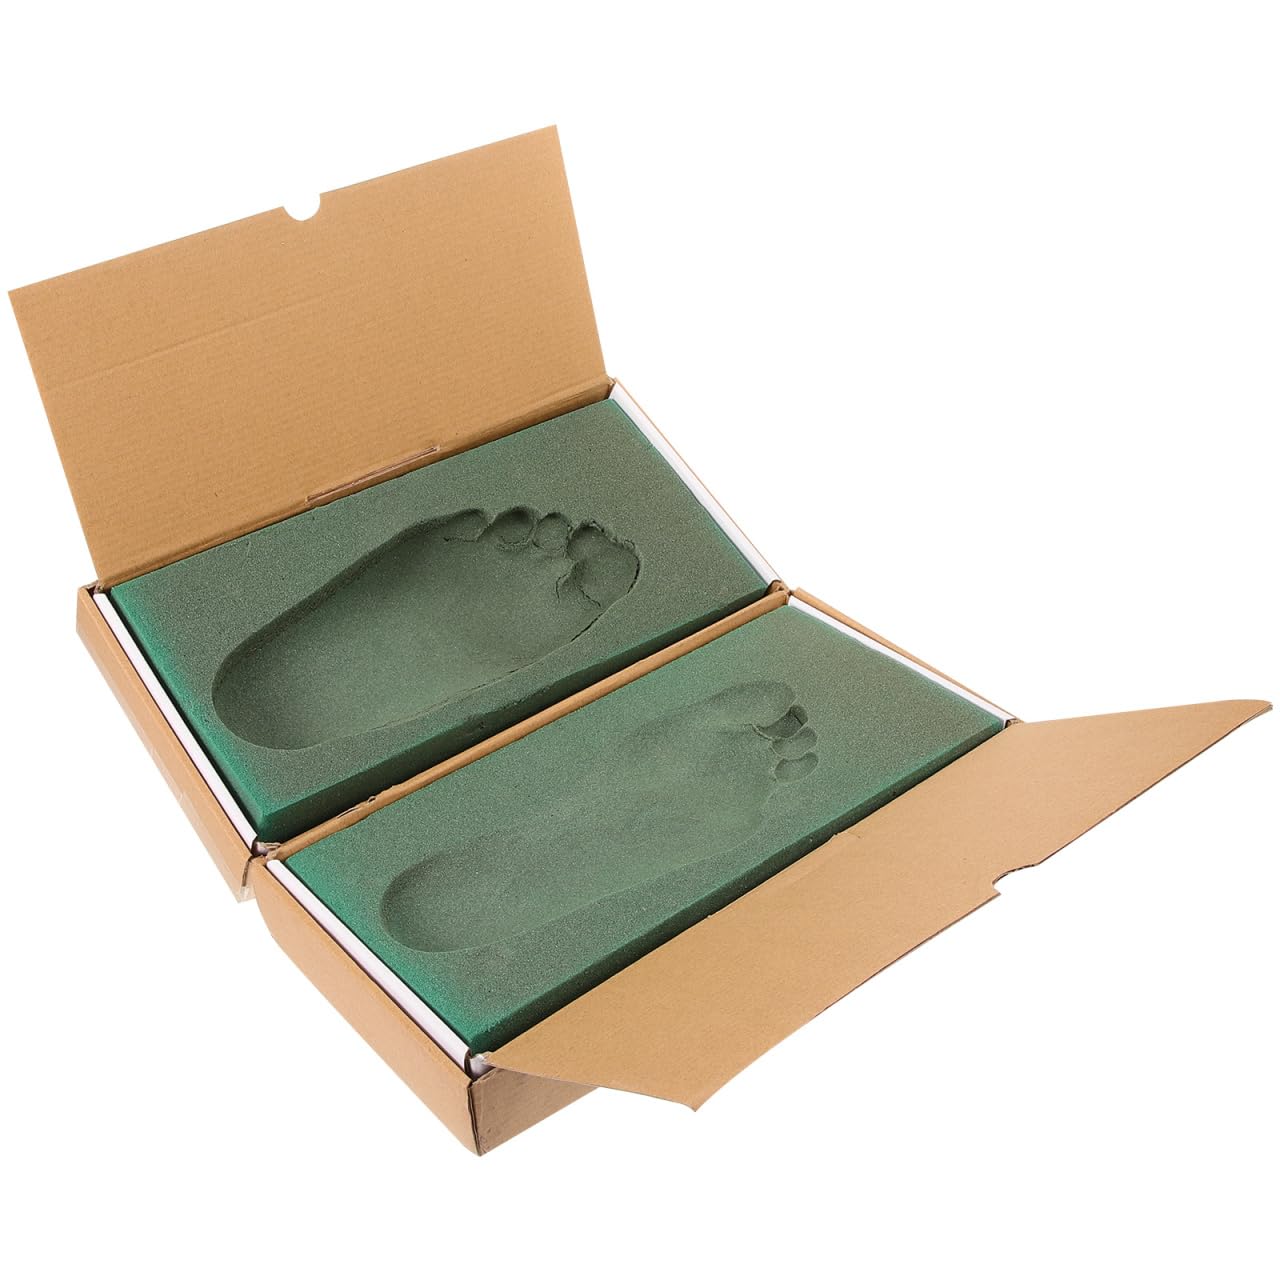
One of the most popular mail-order kits is the EXCEART Foot Impression Box, known for its precision and ease of use.
Key Specs
- Dimensions: 12.6 x 12.2 x 1.57 in (32 x 31 x 4 cm)
- Weight: 0.39 lbs
- Material: High-density foam, paper box
- Color: Peacock green
- ASIN: B0CN3DGZT8
- Amazon Rank: #420 in Shoe Care Kits
- Rating: 4.0/5 stars (9 global reviews)
User Feedback
- Pros: Clean impressions, accurate results, DIY-friendly
- Cons: Foam depth limited for very large feet; not microwave-safe
Real-World Result: One user, Kenneth Peel, created functional orthotics for $40—saving hundreds compared to clinic prices.
Accuracy vs. App Scans

Many apps claim to create “custom” insoles using phone cameras. But they fall short.
| Feature | Foot Impression Kit | Smartphone App |
|---|---|---|
| Depth Sensitivity | Captures 3D contours | Estimates from 2D images |
| Weight Distribution | Controlled, neutral loading | No weight control |
| Arch Detail | High fidelity | Often inaccurate |
| Clinical Use | Accepted by podiatrists | Not medically validated |
Physical molding remains the gold standard for remote orthotic design.
Safety and Break-In Tips
Even perfectly made orthotics require gradual use.
Start Slow
- Days 1–3: Wear 1–2 hours daily
- Days 4–7: Increase to 4–6 hours
- Week 2+: Full-day wear if comfortable
Monitor for Discomfort
Some initial pressure is normal, but stop use if you experience:
– Sharp pain
– Numbness
– Increased swelling
These may indicate overcorrection or poor fit.
Special Precautions
- Diabetics or neuropathy patients: Consult a doctor before use
- Circulatory issues: Avoid prolonged pressure
- Cleaning: Use mild soap and water; air dry only
FDA Disclaimer: These devices are not evaluated to diagnose or treat disease.
Professional Oversight Matters
Top providers involve licensed experts in the process.
Expert Involvement
- Dr. Michael Saldino, ABCOP-certified orthotist, oversees Texas Foot Orthotics and has treated over 50,000 patients.
- Board-certified pedorthists review every impression for biomechanical accuracy.
- Orthotics are handcrafted in U.S. labs—no mass-produced 3D printing.
Quality Guarantees
Reputable companies offer:
– 180-day money-back guarantee
– Free shipping
– Expert consultation
This reflects confidence in both the kit and the final product.
Cost and Value Comparison
Custom foot impression kits deliver significant savings.
| Option | Average Cost | Turnaround | Professional Oversight |
|---|---|---|---|
| In-Clinic Visit | $300–$600 | 1–2 weeks | Yes |
| Mail-Order Kit | $60–$100 | 10–14 days | Yes (with top brands) |
| Generic Insoles | $20–$40 | Immediate | No |
For less than a third of the price, kits provide comparable biomechanical correction.
Final Tips for Best Results
Maximize your success with these expert-backed strategies.
Get Help During Molding
Have a partner assist you to:
– Check alignment
– Prevent shifting
– Ensure even pressure
This boosts accuracy significantly.
Confirm Your Foot Type First
If uncertain, consult a podiatrist or use a wet test:
1. Wet your foot
2. Step on paper
3. Analyze the print:
– Flat foot: Full imprint
– High arch: Narrow band along outer edge
– Neutral: Balanced curve
Choose your impression method accordingly.
Follow Instructions Exactly
Skipping steps or improvising leads to flawed molds. Read the manual thoroughly—every detail matters.
A custom foot impression kit is more than a DIY tool—it’s a gateway to personalized foot health. By capturing your foot’s true 3D shape under controlled conditions, it enables orthotics that correct, support, and comfort far better than off-the-shelf inserts. Whether you’re healing from injury, optimizing performance, or just tired of sore feet, this kit offers a precise, affordable, and accessible solution. For best results, follow alignment guidelines, pick the right method for your foot type, and consider professional input when in doubt. Your feet carry you every day—give them the support they deserve.