")


If you’ve ever heard a clicking sound in your ankle joint while walking, climbing stairs, or doing a simple calf stretch, you’re not alone. This sensation—often called ankle crepitus—is more common than you might think. While it’s usually harmless when painless, persistent or painful clicking can signal underlying issues like tendon instability, joint stiffness, or past injury. The good news? Most causes are treatable with targeted self-care. In this guide, you’ll learn how to stop clicking sounds in the ankle joint using proven methods: from soft tissue release and joint mobilization to strengthening and long-term prevention. Whether your ankle started clicking after a sprain or for no clear reason, this step-by-step plan will help you restore smooth, silent movement—starting today.
Identify the Real Cause Behind the Click
Not all ankle clicking is the same. To fix it, you first need to know why it’s happening. Some pops are normal; others point to mechanical dysfunction.
Is It Gas or Mechanical Snapping?
Most harmless joint sounds come from cavitation—a quick release of gas bubbles in the synovial fluid when pressure shifts during movement. These pops are:
– Occasional
– Painless
– Non-repetitive (don’t happen every time you move)
– Often occur after sitting or inactivity
In contrast, mechanical clicking—like a tendon snapping over bone—is predictable and repeatable. It usually happens on the outer ankle and is linked to peroneal tendon subluxation or joint capsule tightness. If your ankle clicks every time you step or squat, it’s mechanical—and fixable.
Common Sources of Repetitive Clicking
| Source | Location | Trigger Motion |
|---|---|---|
| Peroneal tendon subluxation | Outer ankle | Dorsiflexion + eversion |
| Joint capsule restriction | Front/lateral ankle | Weight-bearing dorsiflexion |
| Cartilage defect | Deep joint | Any motion, especially under load |
| Bony groove abnormality | Fibular malleolus | Sudden ankle rotation |
If your clicking is consistent and bothersome, it’s likely not gas—it’s a mechanical issue that responds well to mobility and strength work.
Perform Daily Soft Tissue Release

Tight muscles and fascial adhesions restrict smooth tendon movement, forcing tendons to “snap” over bones. Releasing these tissues reduces friction and restores glide.
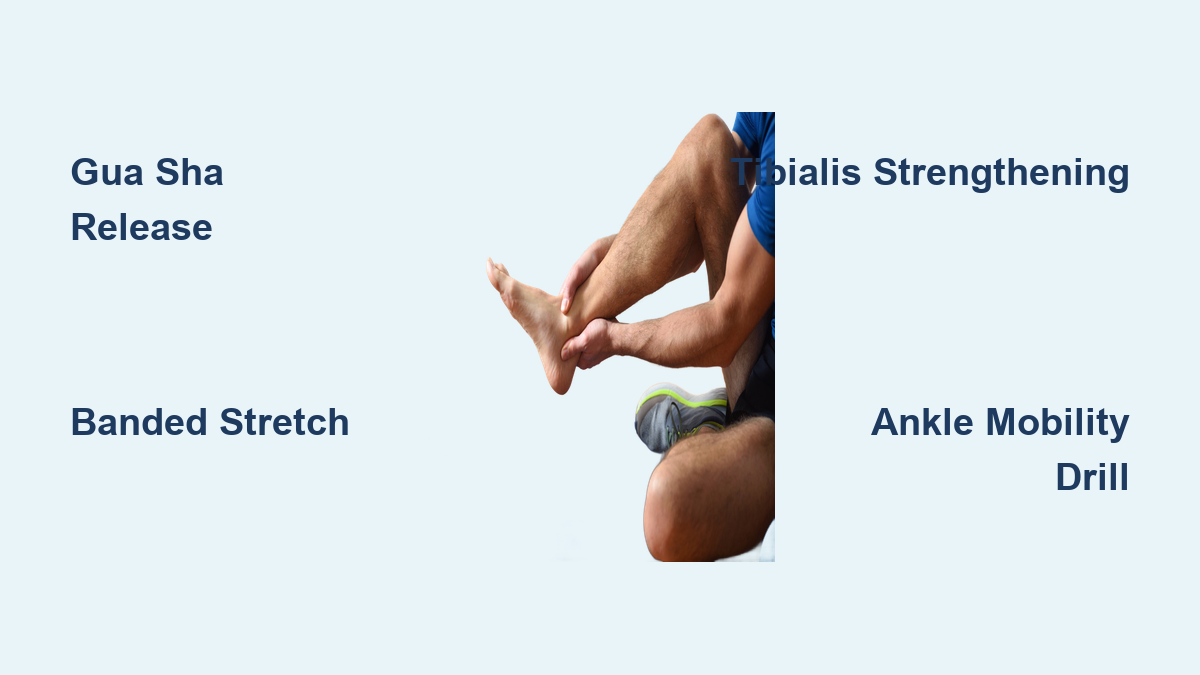
Use Gua Sha for Deep Fascial Release
Gua sha (scraping therapy) breaks up scar tissue and boosts blood flow.
How to do it:
1. Apply coconut oil or lotion to your calf, outer ankle, and top of the foot.
2. Use a smooth-edged tool (like a spoon or gua sha stone) at a 30–45° angle.
3. Press gently and make 5–10 slow strokes upward (toward the heart).
4. Focus on gritty or tender areas—especially behind the fibula.
Do this daily or every other day. Mild redness is normal and indicates improved circulation.
Foam Roll with Ankle Motion
Static rolling won’t fix tendon tracking—dynamic foam rolling will.
For peroneals:
– Lie on your side with a foam roller under the outer lower leg.
– Find a tight spot and move your ankle through dorsiflexion and plantarflexion.
– Hold each trigger point for 5–6 seconds while moving.
– Repeat for 1–2 minutes per side.
This mimics real joint motion, helping tendons glide smoothly instead of catching.
Release Sciatic Nerve Tension
Nerve irritation (e.g., from L5/S1) weakens peroneal muscles, increasing instability.
Try tennis ball nerve flossing:
– Place a lacrosse ball just off the spine at the base of the ribs or top of the pelvis.
– Lean into it for 30–60 seconds.
– Move the ankle up and down slowly during release.
– Re-test ankle motion afterward—you may notice less clicking.
Mobilize the Ankle Joint Capsule
A stiff joint capsule limits dorsiflexion, forcing tendons and bones into abnormal positions that cause popping.
Apply Banded Ankle Stretch
This stretch targets the posterior and lateral capsule—the main culprits behind restricted motion.
Steps:
1. Loop a resistance band around the ball of your foot.
2. Anchor it behind you (e.g., under a couch or door).
3. Step forward into a half-kneeling lunge.
4. Keep your heel down and knee aligned with the second toe.
5. Gently pulse forward for 60–120 seconds.
For lateral bias (outer ankle clicking), angle your foot inward slightly or pull the band laterally.
Pro tip: Do this after soft tissue work for maximum effect.
Use Manual Joint Mobilization
You can mimic a physical therapist’s technique at home.
How to:
1. Sit with your leg extended.
2. Locate the area where clicking occurs (e.g., front or side of ankle).
3. Press your fingers firmly into the joint line.
4. As you move your ankle up and down, apply gentle oscillations—side to side or in small circles.
5. Spend 1–2 minutes per session.
This helps free up adhesions within the joint and improves glide.
Strengthen Key Stabilizing Muscles

Weak tibialis anterior and peroneal muscles fail to hold tendons in place, leading to subluxation and snapping.
Activate the Tibialis Anterior
This front-of-shin muscle controls dorsiflexion and prevents anterior clicking.
Exercise: Wall Toe Raises
– Stand facing a wall, feet hip-width apart, slightly turned out.
– Shift weight to your heels.
– Slowly raise your toes toward the ceiling.
– Hold at the top for 5 seconds, then lower slowly over 3–5 seconds.
– Stop just before the click, hold 3–5 seconds (motor control training), then continue.
Do 5–10 reps per set, 1–2 times daily.
Progression: Step forward and lean away from the wall to increase demand.
Build Eccentric Calf Strength
Strong calves absorb load and stabilize the Achilles-peroneal complex.
Eccentric Calf Raises:
– Stand on a step, heels hanging off.
– Rise onto both toes.
– Shift weight to the affected leg and lower slowly over 5–6 seconds.
– Repeat for 8–12 reps, 2–3 sets.
For extra challenge, place a tennis ball between your heels to engage stabilizers.
Improve Proprioception with Balance Drills
Better joint awareness reduces instability-related clicking.
Single-Leg Balance:
– Stand barefoot on one leg for 30 seconds.
– Progress to eyes closed or standing on a foam pad.
– Do 2–3 sets daily.
Restore Full Ankle Mobility
Limited range of motion forces compensatory movements that strain tendons and joints.
Perform the Clock Stretch Daily
This drill mobilizes the ankle in all directions—critical for eliminating positional popping.
How to:
1. Kneel in a scissored stance: affected leg forward, back knee on a pillow.
2. Hands on front knee.
3. Press the front heel down and lunge forward.
4. Move the knee through clock positions: 12 → 1 → 3 → 6 → 9 o’clock.
5. Pause for 1–2 seconds at any spot that clicks or feels tight.
6. Spend extra time in restricted zones.
Do this once daily, especially after workouts or prolonged sitting.
Add Ankle Circles and Alphabet Drill
These warm up multiple planes of motion.
Ankle Circles:
– Elevate leg.
– Rotate foot in 10 clockwise, 10 counterclockwise circles.
– Keep movement smooth and controlled.
Draw the Alphabet:
– Lie down or sit, elevate foot.
– “Write” A–Z with your big toe.
– Engages all ankle muscles and improves coordination.
Support the Ankle During Recovery

Bracing and orthotics reduce strain while tissues heal—especially important for active individuals.
Wear a Supportive Ankle Brace
A lace-up brace with rigid stays prevents excessive motion that triggers subluxation.
Recommended: McDavid Lace-Up Ankle Brace with Support Stays
– Wears well in athletic shoes
– Provides medial and lateral stability
– Helps retrain joint positioning
Wear it:
– All day during initial 6–12 weeks of rehab
– Remove during balance and strengthening exercises to avoid dependency
Use Proper Orthotics
Poor arch support alters foot mechanics, increasing stress on peroneal tendons.
| Orthotic | Best For | Key Benefit |
|---|---|---|
| FootChair Orthotic | Running, hiking, lace-up shoes | Adjustable arch height for custom fit |
| FootChair Slim | Flats, heels, narrow shoes | Low-profile but supportive |
| Custom Orthotics | Chronic instability or asymmetry | Tailored to stabilize peroneals |
Replace worn orthotics every 6–12 months.
Know When to See a Professional
Most clicking resolves with self-care—but some signs mean you need expert help.
Red Flags: Seek Evaluation Now
- Pain with clicking
- Swelling or warmth
- Feeling of instability or “giving way”
- Weakness or foot drop
- Locking or catching sensation
- Onset after ankle sprain or trauma
These suggest tendon injury, cartilage damage, or nerve involvement.
Imaging You May Need
- X-ray: Rules out fractures or bony abnormalities
- MRI: Best for cartilage, ligaments, and osteochondral lesions
- Ultrasound: Dynamic view of tendon motion
- CT scan: Detailed bone anatomy, surgical planning
A physical therapist or sports medicine doctor can order these and guide treatment.
Stick to a Daily Click-Stop Protocol
Consistency beats intensity. Follow this routine daily for 6–12 weeks to eliminate clicking:
-
Morning
– 2 minutes gua sha or foam rolling
– 1 minute banded ankle stretch
– 10 ankle circles -
Midday or Post-Workout
– Clock stretch (2 minutes)
– Tibialis anterior exercise (2 sets of 10)
– Single-leg balance (2 sets of 30 seconds) -
Evening
– Tennis ball release (lower back or calf)
– Draw the alphabet with toes
Wear your brace during the day. Track progress weekly—most people notice improvement in 2–4 weeks.
Final Note: Clicking sounds in the ankle joint are usually not dangerous, but they’re also not something to ignore if they’re frequent or bothersome. With the right combination of soft tissue work, joint mobilization, strength training, and biomechanical correction, you can stop the noise and restore confidence in every step. The key is early, consistent action—don’t wait for pain to start. Your ankles are built for smooth motion. Help them get back to it.