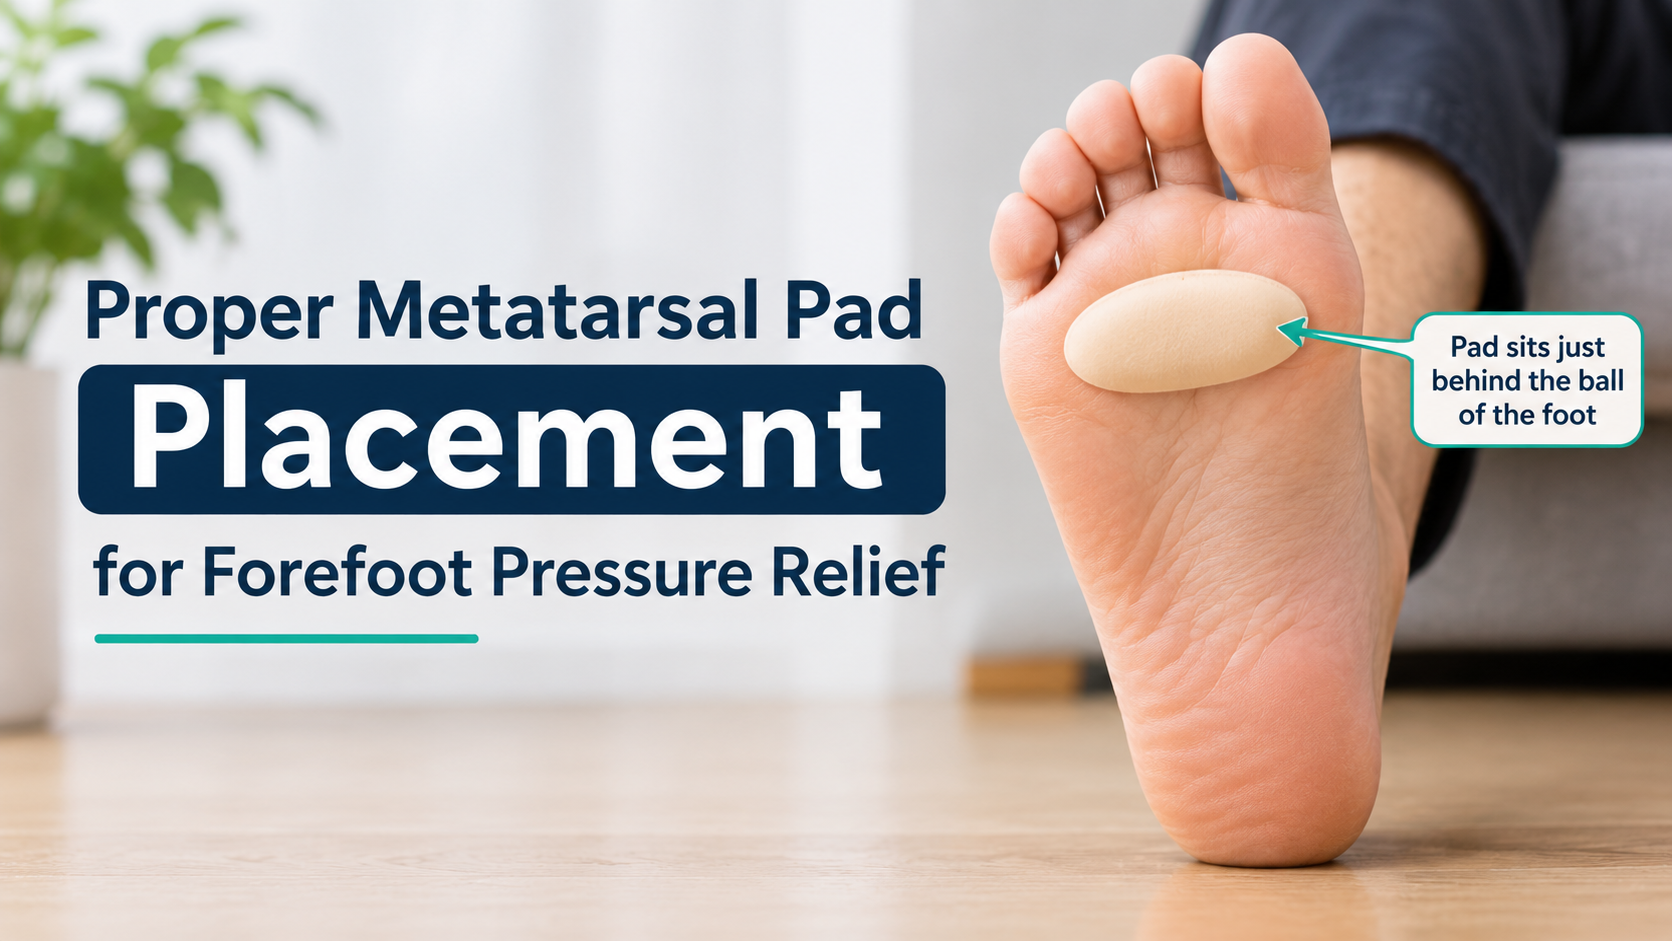
If you have ever bought a metatarsal pad and felt more pain afterwards, the pad probably wasn’t the problem. The position was. A metatarsal pad is a small piece of foam, gel or felt that works only when it sits in one precise spot under your foot. Move it a centimetre too far forward or back and it can press on the exact area you wanted to protect.
This guide explains exactly where a metatarsal pad goes, how to find that spot on your own foot, how to fix it to an insole or to your skin, and how to adjust it when something still feels wrong. It also covers common mistakes, choosing the right pad, and when it is time to see a professional.
What Is a Metatarsal Pad?
A metatarsal pad (often shortened to “met pad”) is a teardrop, oval or dome-shaped cushion used to take pressure off the front of the foot. It is also sold under names such as ball-of-foot cushion, metatarsal dome or metatarsal support. The pad does not simply “cushion” the sore area. Instead, it lifts and gently spreads the metatarsal bones just behind their heads, which shifts load away from the tender spot and back onto a wider area of the forefoot.
Your foot has five long metatarsal bones. Their rounded ends, called the metatarsal heads, form the ball of the foot and take a large share of your body weight every time you push off to walk or run. When those heads are overloaded, irritated or squeezed together, pain follows.
Where Exactly Does a Metatarsal Pad Go?
The correct position is proximal to the metatarsal heads. In plain words, that means closer to the heel than the ball of the foot. The diagram below shows the target zone on the sole of the foot.

Three reference points make placement easy:
- Front edge: the pad’s front edge should sit just behind the bony bumps of the ball of your foot.
- Centre: the middle of the pad lines up with the space between your 2nd and 4th toes, since these central metatarsals take the most load.
- Height: the highest point of the dome should rest under the long shafts of the metatarsal bones, behind the heads.
Why “Behind the Ball” Matters
Think of the metatarsal heads like the knuckles of your hand. If you wanted to take pressure off the knuckles, you would not stack padding on top of them. You would support the bones just behind them so the knuckles are no longer pushed down. The same logic applies to the foot. A pad placed directly under the heads adds a lump under an already sore area. A pad placed behind them lifts the bones and redistributes pressure.
Correct vs Incorrect Placement
Most placement problems fall into one of two groups: too far forward or too far back.

| Placement | What happens | Typical symptom |
|---|---|---|
| Too far forward (under the heads) | Adds height beneath the sore area and increases pressure | Pain gets worse, burning or bruised feeling in the ball |
| Correct (just behind the heads) | Lifts and spreads the metatarsals, shifting load backwards | Gradual relief during walking and standing |
| Too far back (under the arch) | Acts like an arch bump and does little for the forefoot | Arch ache or cramping, no change in ball pain |
| Off-centre (too far inside or outside) | Relieves only some of the metatarsals | Pain moves to a neighbouring spot |
How to Find the Right Spot: Step by Step
You do not need any special equipment to place a metatarsal pad accurately. Take two or three minutes and follow the process below.

Step 1: Locate the Ball of Your Foot
Sit down, cross your leg and press your thumb along the sole just behind your toes. You will feel a row of rounded bumps. These are the metatarsal heads. Find the most tender one if you have pain, and note which toes it lines up with.
Step 2: Mark a Line Behind the Heads
Remove the insole from your shoe and place it on a table. Put your foot on it, or hold it against your foot, and mark with a pen where the bumps sit. Then draw a second line about ½ to ¾ inch (1 to 2 cm) behind it. That second line is your placement guide.
Step 3: Position the Pad
Set the pad so its front edge touches the guide line and its centre lines up with your 2nd to 4th toes. Most pads have a wider end and a narrower end. The wider, higher end normally faces the toes, but always follow the instructions that come with your product. Peel and stick the pad if it has adhesive, or apply it directly to the insole with a light layer of double-sided tape.
Step 4: Test and Fine-Tune
Put the insole back in the shoe, wear a normal sock and walk around for ten minutes. You should feel the pad as a gentle bump behind the ball of the foot, not as a sharp ridge. If the position feels slightly off, move the pad in small steps of 2 to 3 mm rather than large jumps.
On the Insole or on the Foot?
There are two common ways to use a metatarsal pad. The right one depends on your shoes, your foot shape and how long you will be wearing it.
| Method | Best for | Pros | Cons |
|---|---|---|---|
| Stuck on the insole or shoe footbed | Everyday shoes, work boots, sneakers | Stays in place, no skin irritation, reusable | One pad per shoe, may need repositioning if the insole slides |
| Worn on the foot (sleeve or adhesive) | Sandals, heels, dress shoes | Moves with the foot, works in many shoes | Can slip with sweat, adhesive may irritate sensitive skin |
| Built into a full insole | Long-term use, sports | Correct shape, professionally contoured | Higher cost, less flexible placement |
If you choose an adhesive pad that sits directly on the skin, make sure your foot is clean and dry. Press it down firmly for about 30 seconds, and place it using the same rule: just behind the ball of the foot.
What Conditions Do Metatarsal Pads Help?
Metatarsal pads are commonly suggested for pain and pressure in the forefoot. They may help with:
- Metatarsalgia: pain and inflammation in the ball of the foot, often from high-impact activity or tight shoes.
- Morton’s neuroma: a thickened nerve between the toes, usually between the 3rd and 4th, which causes burning, tingling or the feeling of a pebble in the shoe.
- Capsulitis of the second toe joint: irritation at the base of the 2nd toe.
- Sesamoiditis: soreness beneath the big toe joint (placement may differ here, so professional advice is helpful).
- Thinning fat pad: natural wear of the cushioning under the ball of the foot with age.
Because several different problems cause ball-of-foot pain, a pad is a tool and not a diagnosis. If you are not sure what is causing your pain, a podiatrist or physiotherapist can confirm it.
What You Should Feel After Placing the Pad
A properly placed pad has a recognisable effect. The ball of your foot should feel unloaded, almost as if your toes are floating a little. The pad itself will feel noticeable at first, but it should not hurt, cramp or pinch.

Expect an adjustment period. Many people need one to two weeks of gradual wear to get used to the new foot position. Start with a couple of hours a day, then increase as comfort allows.
Common Mistakes to Avoid
- Placing the pad under the ball of the foot. This is the number one error and usually makes the pain worse.
- Using a pad that is too thick. A thick pad can push the foot forward or upward and cause toe crowding. Start thin.
- Picking the wrong size. A pad that is too small gives no spread, and one that is too wide rubs on the sides of the foot.
- Letting the pad slide. Pads that move during the day lose their effect. Use adhesive or double-sided tape.
- Wearing it in shoes that are too tight. A pad adds volume. If your shoe has a narrow toe box, there may not be enough room.
- Expecting an instant fix. Relief builds over days, not minutes.
- Ignoring the underlying cause. Tight calves, high heels or repeated impact can keep the problem alive even with a perfect pad.
Troubleshooting: Fine-Tuning Your Placement
If your pain has not changed after a week of consistent use, check the table below before giving up on the pad.
| What you notice | Likely cause | What to try |
|---|---|---|
| Pain in the ball is worse | Pad is too far forward or too thick | Move it back 3 to 5 mm or switch to a thinner pad |
| Arch cramping | Pad is too far back | Move it forward in small steps, closer to the heads |
| Pain on the outer side of the forefoot | Pad is too far toward the inside | Shift it slightly towards the little toe side |
| Toes feel crowded or numb | Shoe is too tight with the pad inside | Use a shoe with a wider, deeper toe box |
| Pad keeps moving | Poor adhesion or loose insole | Use fresh adhesive or fix the insole in place |
| Skin irritation | Adhesive reaction or sweat | Switch to an insole-mounted pad or a hypoallergenic material |
Choosing the Right Metatarsal Pad
Good placement is only half of the result. The product matters too. When comparing options, look at these features:
| Feature | What to look for |
|---|---|
| Material | Soft gel for comfort, foam for light support, felt for firm and moldable support |
| Thickness | 3 to 6 mm is a sensible starting point for most people |
| Shape | Teardrop or oval shapes suit most feet; split designs may suit neuroma pain |
| Attachment | Self-adhesive backing for insoles, sleeve design for wearing in any shoe |
| Size | Should span the width of the central metatarsals without touching the sides of the foot |
| Washability | Reusable, washable pads keep adhesive longer and stay hygienic |
Whichever type you choose, make sure your shoes have enough depth and a roomy toe box. A cushioned shoe with a rocker sole and a wide forefoot often works well alongside a metatarsal pad, because it lowers forefoot load during push-off.
Pairing Your Pad with Healthy Habits
- Choose supportive footwear. Avoid very flat, thin-soled shoes and high heels that shift weight forward.
- Stretch your calves. Tight calf muscles raise forefoot pressure with every step.
- Strengthen the foot. Toe curls, towel scrunches and short-foot exercises help the small muscles share the load.
- Manage activity. Reduce running or jumping volume while the area calms down.
- Maintain a healthy weight. Every extra kilogram adds load to the forefoot.
- Replace worn insoles. A flattened insole stops supporting properly, and the pad will no longer sit at the right height.
When to See a Professional
A podiatrist can examine your gait, rule out stress fractures and nerve problems, and, where needed, prescribe custom orthotics with a built-in metatarsal dome positioned exactly for your foot.
Frequently Asked Questions
Should a metatarsal pad go under or behind the ball of the foot?
Behind it. The pad belongs about ½ to ¾ inch (1 to 2 cm) closer to the heel than the bony bumps of the ball, so it supports the bones instead of pressing on the heads.
Which way does a metatarsal pad face?
For most teardrop-shaped pads, the wider, higher end sits toward the toes and the narrower end tapers toward the heel. Check the packaging, since some designs differ.
Can I wear a metatarsal pad in both shoes?
Only if both feet need it. Many people use a pad on just the painful side, but if both forefeet are sore, use one in each shoe and place them symmetrically.
How long does it take for a metatarsal pad to work?
Some people feel relief within a day or two, while others need up to two weeks to adapt. If nothing improves after about a month of correct placement, seek professional advice.
Can I use a metatarsal pad with a heel or dress shoe?
Yes, but choose a slim, low-profile pad that sticks directly to the foot or the insole. High heels push more weight onto the forefoot, so relief may be smaller than in flat shoes.
Is it normal for the pad to feel strange at first?
Yes. A mild “bump” sensation is common for the first few days. Sharp pain, numbness or cramping is not normal and means the position or thickness needs adjustment.
How do I clean and care for a metatarsal pad?
Wipe gel and foam pads with mild soap and water, let them air dry and keep them away from direct heat. Replace the pad when it flattens, cracks or loses its grip.
Final Thoughts
Metatarsal pad placement comes down to one rule: just behind the ball of the foot, centred on the 2nd to 4th toes, never directly under the metatarsal heads. Find the bony bumps, mark a line 1 to 2 cm behind them, position the pad, then test and adjust in small steps. Combined with roomy, supportive shoes and a few simple habits, correct placement can turn a pad from a frustrating accessory into genuine relief.
This article is for general information only and is not a substitute for professional medical advice, diagnosis or treatment. If you have ongoing foot pain, consult a qualified healthcare provider.