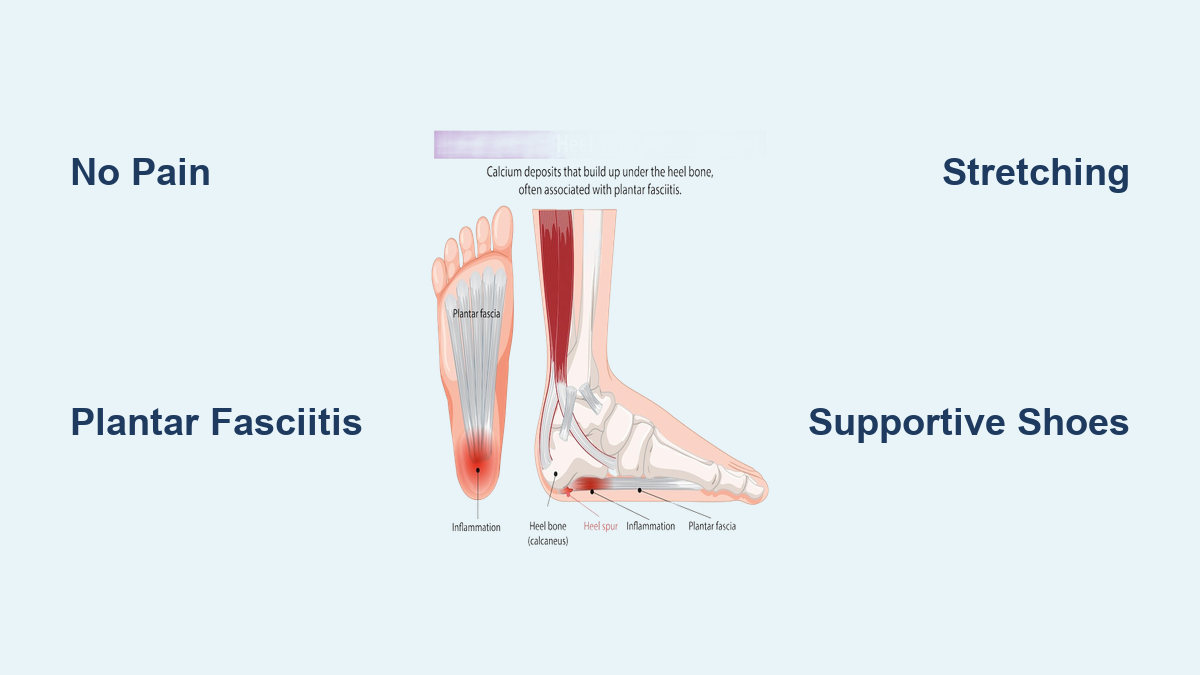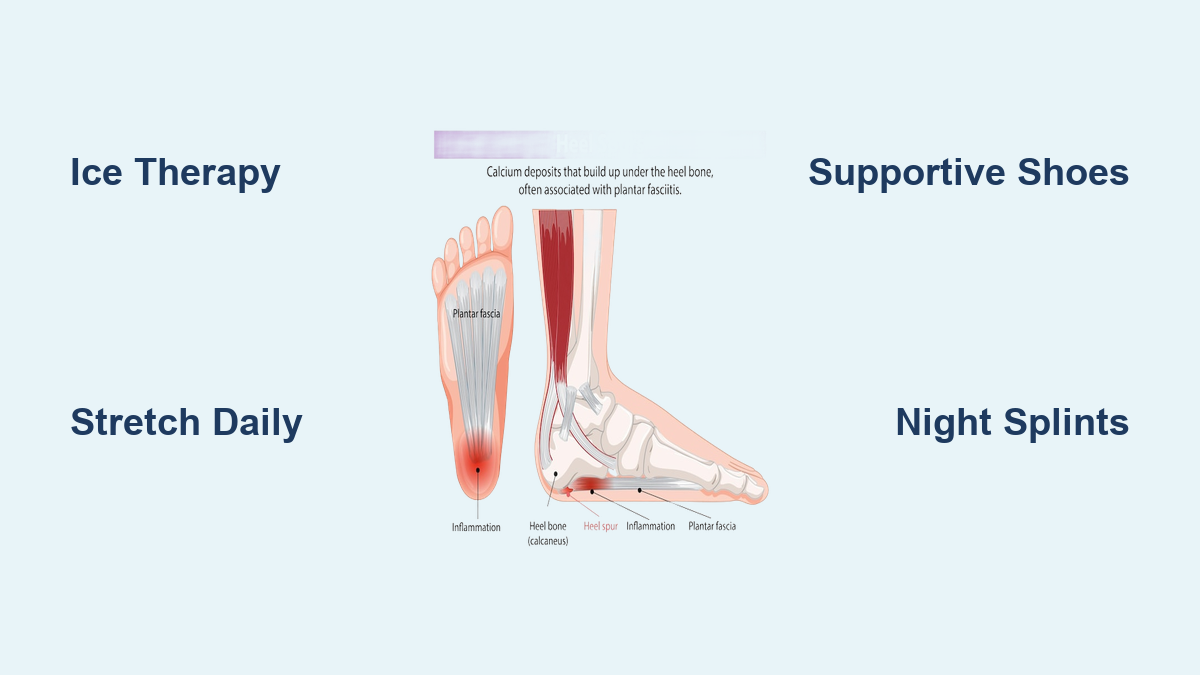
If you’ve ever taken your first step out of bed only to feel a sharp, stabbing pain under your heel, you may be dealing with heel spurs. These bony growths develop on the heel bone over time due to repetitive stress and are often linked to plantar fasciitis—though the real source of pain is usually inflamed soft tissue, not the spur itself. The good news? Over 90% of heel spur cases improve with simple, effective home treatments, eliminating the need for surgery or invasive procedures.
You don’t need expensive equipment or a doctor’s visit to start healing. With consistent care—including targeted stretching, proper footwear, and inflammation control—most people experience significant relief within 6–8 weeks. This guide walks you through proven, science-backed strategies to treat heel spurs at home, so you can walk comfortably again—starting today.
Identify Whether You Have Plantar or Dorsal Heel Spurs

Before treating heel pain, it’s essential to pinpoint the type you’re experiencing—because not all heel pain is the same.
Plantar Heel Spurs Cause Bottom-of-Heel Pain
If your pain is on the underside of the heel, especially when you take your first steps in the morning, you likely have a plantar heel spur. This type forms where the plantar fascia connects to the heel bone. The pain often feels like a nail being driven into your foot and improves slightly after walking but returns with prolonged standing or activity.
Dorsal Heel Spurs Hurt at the Back of the Heel
Pain at the back of the heel, near the Achilles tendon, points to a dorsal (or posterior) heel spur. This type worsens when wearing closed shoes or stretching your calf. It’s commonly aggravated by tight footwear or uphill walking.
While an X-ray can confirm the presence of a spur, many people have visible spurs without any pain. That means treatment should focus on symptom relief, not just the image.
Stop Aggravating Your Heel: Rest and Activity Modification
Reducing strain on your heel is the most critical first step in healing.
Avoid High-Impact Activities That Worsen Pain
Running, jumping, or standing for long periods on hard surfaces like concrete can delay healing. Take a short break—1–2 weeks of reduced impact—to allow inflammation to subside.
Replace high-impact workouts with low-impact alternatives:
– Swimming
– Cycling
– Elliptical training
These keep you active without pounding your heels.
Never Walk Barefoot on Hard Floors
Going barefoot, especially first thing in the morning, puts maximum stress on the plantar fascia. Always wear supportive shoes or slippers—even indoors.
Follow the 10% Rule When Returning to Activity
When you resume walking, running, or standing, increase time or intensity by no more than 10% per week. This gradual approach prevents re-injury and gives your tissues time to adapt.
Reduce Inflammation with Ice Therapy
Cold therapy is one of the fastest ways to reduce swelling and dull pain in the heel.
Roll a Frozen Water Bottle Under Your Foot
Freeze a plastic water bottle and roll your bare foot over it for 5–15 minutes, 3–4 times daily. This combines ice, massage, and gentle stretching of the plantar fascia.
- Best times to use: First thing in the morning or after activity.
- The cold numbs pain, while the rolling motion loosens tight tissue.
Use Ice Packs Correctly to Avoid Skin Damage
Wrap an ice pack in a thin towel and apply it to the painful area for 10–15 minutes. Never place ice directly on your skin.
During flare-ups, repeat every 1–2 hours while awake. Gel-based cold wraps are ideal for hands-free, targeted relief.
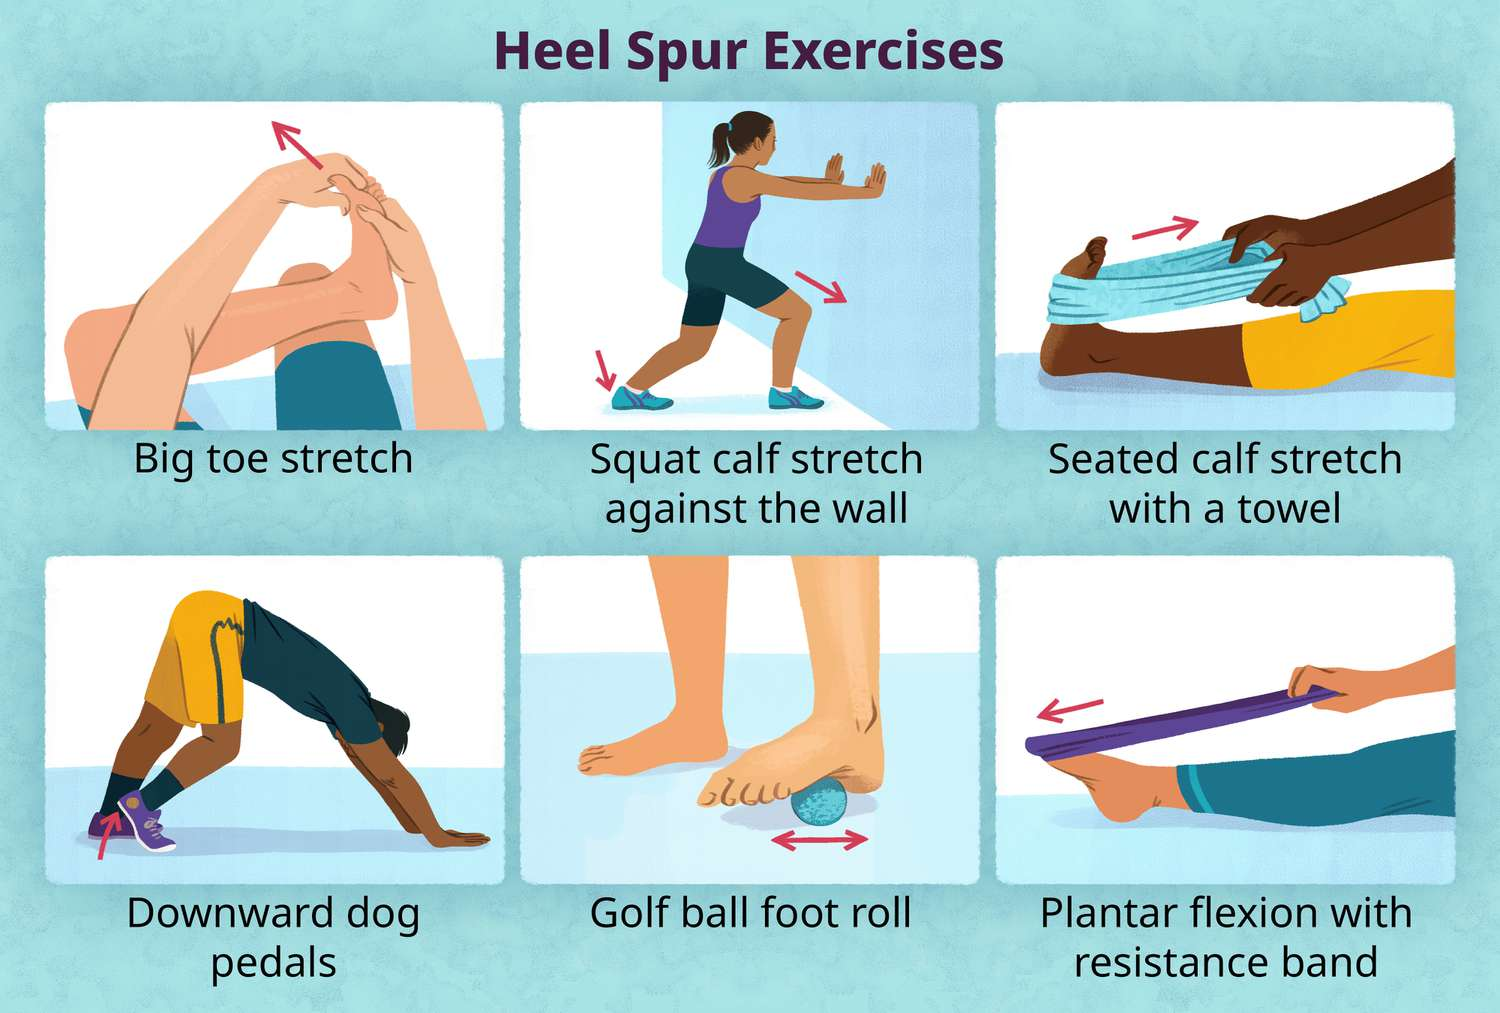
Stretch Tight Calves and the Plantar Fascia Daily
Tight calf muscles pull on the heel and increase tension in the plantar fascia—the main driver of heel pain.
Stretch the Gastrocnemius (Upper Calf)
- Stand facing a wall, one foot forward, one back.
- Keep your back leg straight, heel flat on the floor.
- Lean forward until you feel a stretch in the upper calf.
- Hold for 15–30 seconds, repeat 2–4 times per leg.
Pro tip: Slightly lift your big toe to increase the stretch on the plantar fascia.
Stretch the Soleus (Deep Calf)
- Use the same stance, but bend your back knee slightly.
- Keep your heel down and lean forward.
- This targets the deeper calf muscle that’s active during standing.
Do both stretches morning, afternoon, and night for best results.
Perform the Plantar Fascia Stretch Before Getting Out of Bed
- Sit with one foot crossed over the opposite knee.
- Pull your toes gently toward your shin.
- Hold for 30 seconds, repeat 5 times per foot.
Doing this before standing prevents the classic “first-step” pain.
Try the Towel Stretch for Full-Range Flexibility
- Sit with legs straight.
- Loop a towel around the ball of your foot and pull gently.
- Keep your knee straight for a gastrocnemius stretch; bend it slightly for the soleus.
Repeat 3 times per foot, holding each for 30 seconds.
Break Up Tension with Foot and Calf Massage
Massage boosts blood flow, reduces stiffness, and helps break down adhesions in the plantar fascia.
Roll a Tennis Ball or Lacrosse Ball Under Your Foot
- Place a ball on the floor and roll your foot from heel to toes.
- Use moderate pressure—avoid pressing directly on the most painful spot.
- Do this for 1–2 minutes per foot, daily.
This not only loosens tissue but also strengthens foot muscles over time.
Foam Roll Your Calves for Deep Release
- Lie on your side with a foam roller under your calf.
- Roll slowly from knee to ankle, pausing at tender spots.
- Add ankle movement (point and flex) to release deeper layers.
Use for 1–2 minutes per leg, once or twice daily.
Apply Thumb Pressure to the Arch
- Sit barefoot and use your thumbs to press in circular motions along the arch and heel.
- Focus on tight areas, but don’t press too hard.
Massage for 2–3 minutes, especially in the evening after being on your feet.
Soak Feet in Epsom Salt for Natural Relief
Epsom salt (magnesium sulfate) helps reduce inflammation and relax muscles.
How to Prepare the Soak
- Add 1 cup of Epsom salt to warm (not hot) water.
- Soak your feet for 20–30 minutes, twice daily.
The warm water improves circulation, while magnesium may help reduce muscle tightness.
Important: Skip this if you have diabetes or open sores—consult your doctor first.
Try a Flaxseed Oil Heat Wrap for Chronic Pain
Flaxseed oil contains omega-3 fatty acids, which have natural anti-inflammatory properties.
Make and Use the Wrap
- Mix warm water with flaxseed oil in a basin.
- Soak a towel, wring it out, and wrap it around your heel.
- Place a heating pad over it and leave on for up to 1 hour.
Stay seated or lying down to maximize blood flow. This method combines moist heat and anti-inflammatory action—ideal for stubborn, long-term heel pain.
Use OTC Pain Relievers the Right Way
Over-the-counter medications can help manage pain and swelling—but only when used wisely.
Choose NSAIDs for Inflammation
- Ibuprofen (Advil, Motrin) or naproxen (Aleve) reduce both pain and swelling.
- Acetaminophen (Tylenol) only relieves pain, not inflammation.
Use NSAIDs after activity or in the morning when inflammation is highest.
Limit Use to Avoid Side Effects
Avoid taking NSAIDs for more than 2–3 weeks without medical advice. Risks include stomach ulcers, kidney damage, and high blood pressure.
Always take with food to protect your stomach.
Wear Supportive Shoes and Orthotics Every Day

Your footwear is one of the most powerful tools in treating heel spurs.
Choose Shoes with These Features
- Firm heel counter: Stabilizes your heel.
- Cushioned midsole: Absorbs impact.
- Arch support: Reduces strain on the plantar fascia.
- Slight heel lift (≤1 inch): Takes pressure off the Achilles and plantar fascia.
- Flexible only at the ball of the foot: Should not bend in the middle.
Replace athletic shoes every 300–500 miles or when the cushioning feels flat.
Add Inserts for Extra Support
- Heel cups: Cushion the heel and reduce pressure.
- Over-the-counter arch supports: Affordable and effective.
- Silicone inserts: Reduce friction and absorb shock.
- Custom orthotics: Molded to your foot—best for flat feet or high arches.
Even wearing supportive shoes indoors helps prevent re-injury.
Wear Night Splints to Stop Morning Pain
Morning heel pain is a hallmark of heel spurs. Night splints can eliminate it.
How They Work
Night splints keep your foot in a dorsiflexed position (toes pointing up) while you sleep, preventing the plantar fascia from tightening overnight.
- Wear for 4–6 hours each night.
- Options include rigid braces or soft Strassburg Socks.
- Most people see improvement in 2–4 weeks.
Tip: Wear a thin sock underneath to prevent skin irritation.
Use the RICE Protocol During Flare-Ups
When pain suddenly flares up, follow RICE to control symptoms.
Rest, Ice, Compression, Elevation
- Rest: Stop aggravating activities. Use crutches or a walking boot if needed.
- Ice: Apply cold therapy for 10–15 minutes, 3–4 times daily.
- Compression: Wear supportive socks or sleeves to reduce swelling.
- Elevation: Raise your foot above heart level to improve fluid drainage.
Use RICE after overuse or sudden increases in activity.
Adjust Daily Habits to Support Healing
Small changes in your routine can make a big difference.
Stand on Anti-Fatigue Mats
If you work on your feet, use cushioned mats in the kitchen, office, or workshop to reduce impact.
Stretch Every 30–60 Minutes
Set a timer to stretch your calves and feet if you sit or stand for long periods.
Maintain a Healthy Weight
Every extra pound adds 3–5 pounds of pressure to your feet with each step. Losing just 5–10 pounds can significantly reduce heel pain.
Prevent Heel Spurs from Coming Back
Once pain improves, keep up preventive habits.
Warm Up Before Exercise
Do 5–10 minutes of light cardio and dynamic stretches before running or jumping.
Mix High- and Low-Impact Activities
Balance running with swimming or cycling to reduce repetitive stress.
Stick to Daily Stretches
Continue calf and foot stretches even after pain resolves to maintain flexibility.
Replace Worn Shoes Regularly
Check your shoes monthly. If the heel is worn down or the arch feels flat, it’s time for new ones.
When to See a Doctor
Home treatment works for most people—but not all. See a podiatrist if:
– Pain lasts more than 6–8 weeks despite care.
– You can’t walk normally or stand on your toes.
– The heel is red, warm, or swollen—possible infection.
– You feel numbness or burning—could be nerve damage.
– Pain gets worse at night or while resting.
Professional Treatments (If Needed)
- Physical therapy
- Corticosteroid injections
- Shock wave therapy (ESWT)
- PRP injections
- Minimally invasive surgery
Summary: What Works Best at Home
| Treatment | Frequency | Why It Helps |
|---|---|---|
| Ice or frozen bottle roll | 3–4 times/day | Reduces inflammation |
| Calf and foot stretches | 2–4 times/day | Relieves tissue tension |
| Tennis ball massage | Daily, 1–2 min/foot | Releases tight fascia |
| Epsom salt soak | 20–30 min, 2x/day | Soothes inflammation |
| Flaxseed oil heat wrap | Up to 1 hour/day | Natural anti-inflammatory |
| OTC NSAIDs | Short-term, as directed | Controls pain and swelling |
| Supportive shoes and inserts | Wear daily | Improves foot mechanics |
| Night splints | 4–6 hours/night | Prevents morning pain |
| RICE protocol | During flare-ups | Manages acute symptoms |
Final Note: Heel spurs may not disappear, but the pain doesn’t have to last. With consistent home care—stretching, proper footwear, and inflammation control—most people find full relief within a few months. The key is daily consistency. Start today, stick with it, and you’ll be walking comfortably again sooner than you think. If pain persists beyond 6–8 weeks, consult a podiatrist to explore advanced options.